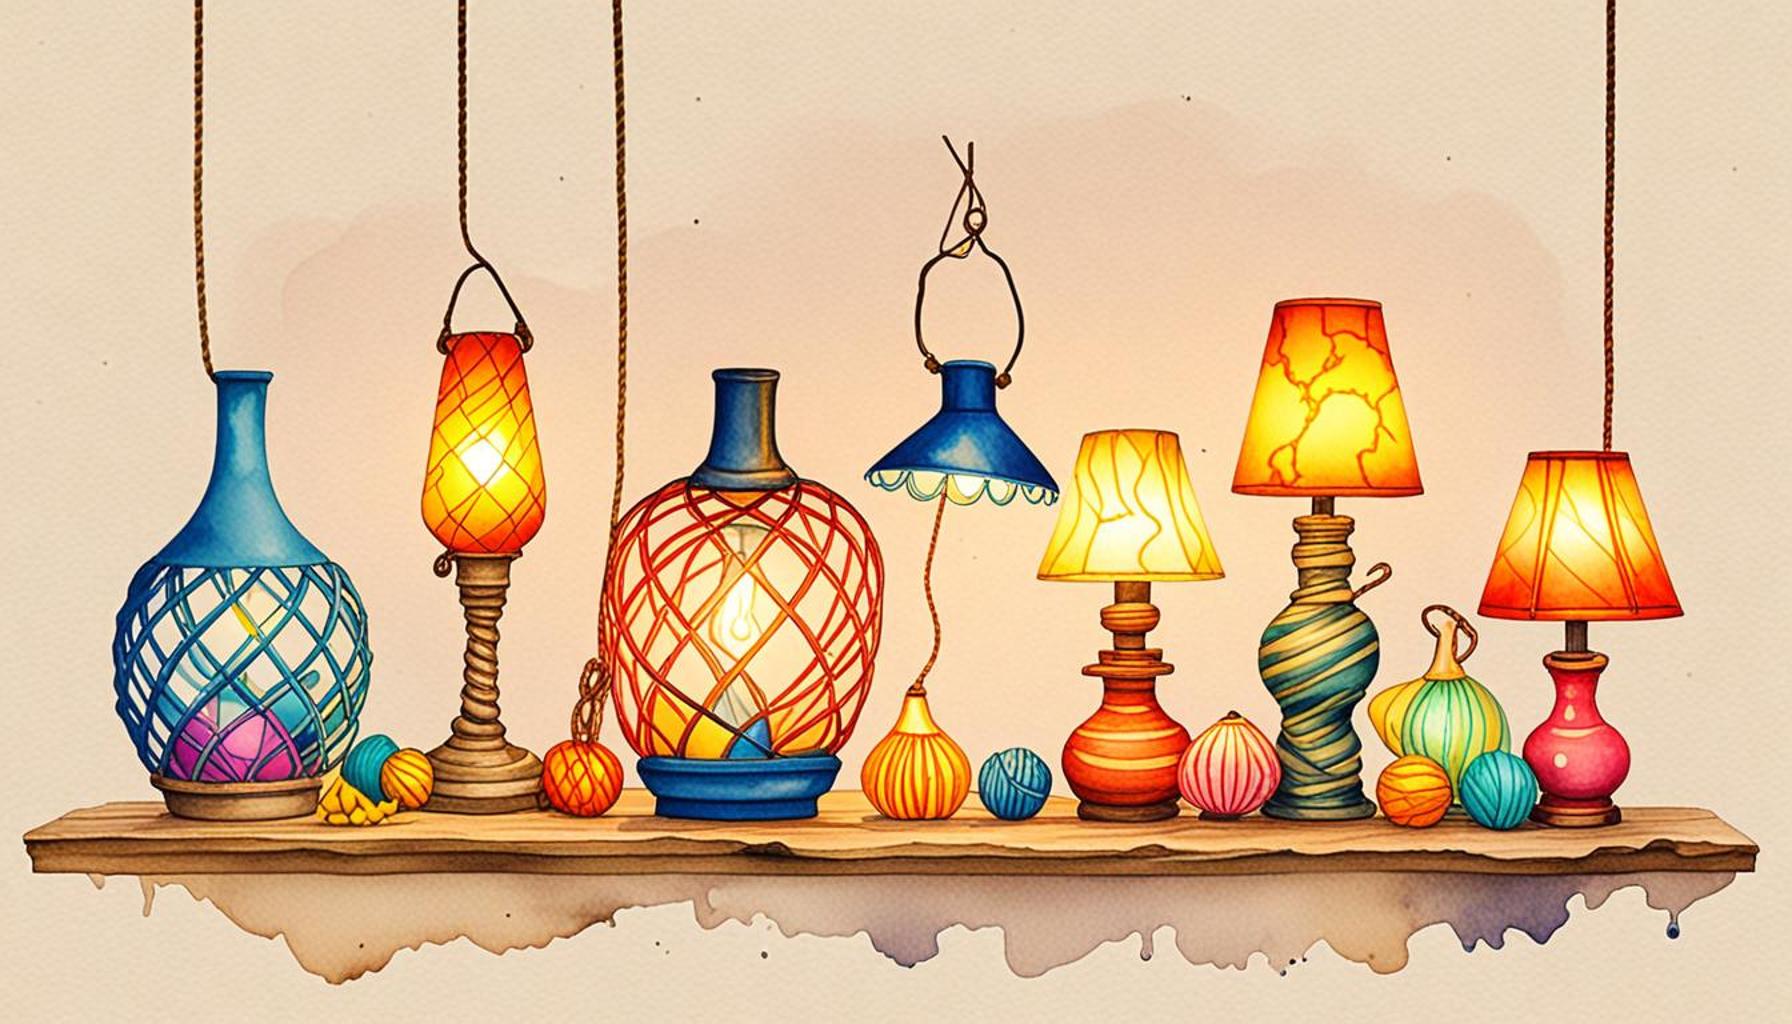
Create Handmade Rope and Glue Lamps DIY Rustic Lighting Guide
Illuminate Your Space with Creativity
Have you ever thought about adding a touch of rustic charm to your home? Creating handmade rope and glue lamps is a fantastic way to achieve that cozy atmosphere while showcasing your artistic skills. These lamps not only provide practical lighting but also infuse your living space with personality and warmth. Imagine standing back to admire a lamp you crafted with your own hands, its flickering light creating an ambiance that feels both welcoming and unique.
This DIY project allows anyone—from beginners to seasoned crafters—to explore their creativity. The materials needed are readily available; you can often find rope at craft stores or online retailers, and glue is a staple in most households. All it takes is a bit of time and effort, and you can construct lamps that not only lit up your space but also serve as stunning conversation starters. In addition, this project encourages experimentation with various shapes and designs, allowing each lamp to have its own distinct character.
Why Choose Rope and Glue Lamps?
- Unique Design: Each lamp can be customized to fit your personal style. Whether you prefer a minimalist look or a more intricate design, the choice of rope thickness, color, and lamp base can blend seamlessly with your existing décor. You can even incorporate paint or additional embellishments to make each piece truly your own.
- Affordability: Utilizing inexpensive materials makes this project budget-friendly. In contrast to store-bought lighting options, which can be prohibitively expensive, handmade lamps can be constructed for a fraction of the price. This is particularly appealing for students, new homeowners, or anyone looking to redecorate without breaking the bank.
- Eco-Friendly: Repurposing materials contributes to sustainable living. By crafting your own lamps, you’re reducing waste and giving new life to materials that might otherwise end up in the landfill. This commitment to sustainability resonates with the growing number of environmentally conscious consumers in the United States.
By embracing this DIY lighting project, you also tap into a growing trend in home décor—where rustic elements blend seamlessly with modern aesthetics. Many people are moving away from mass-produced items and embracing handcrafted goods that tell a story. Whether you are crafting for yourself or creating handmade gifts for loved ones, rope and glue lamps are a perfect choice. They are not only functional but also imbue a sense of love and intentionality that store-bought items simply cannot match.
Get ready to dive into the world of DIY rustic lighting and discover the art of creating your own atmospheric lamps! With just rope, glue, and a bit of creativity, your home can shine with a personality all its own. Plus, the satisfaction of making something with your own two hands is a reward in itself. So grab your materials and let your imagination flow as you embark on this charming journey of self-expression.
CHECK OUT: Click here to explore more
Materials You Will Need for Your Rope and Glue Lamp
Before embarking on your DIY adventure, it’s crucial to gather all the necessary materials. A well-prepared workspace can make the crafting process smoother and more enjoyable. Below is a comprehensive list of items you’ll need to create your very own handmade rope and glue lamp:
- Rope: The star of the show! You can choose from natural jute, cotton, or even synthetic rope, depending on the look you are going for. For a more rustic feel, opt for natural fibers, which can easily be found at local craft stores or online.
- Glue: A strong adhesive is essential for this project. Hot glue guns are popular among DIY enthusiasts because they dry quickly and provide a strong bond. However, you can also use craft glue or wood glue as alternatives for added versatility.
- Lamp Base: You could repurpose an old lamp base, purchase a new one, or even create your own base from materials like wood or metal. The style you choose will significantly influence the final aesthetic of the lamp.
- Light Fixture: Don’t forget to obtain a light socket and appropriate bulb. Make sure that your fixture adheres to safety standards and fits well with your chosen lamp base. LED bulbs are highly recommended for their energy efficiency and longevity.
- Scissors: Sharp scissors are necessary for cutting the rope to your desired lengths, ensuring that your pieces fit neatly around the base.
- Measuring Tape: Before cutting, it’s crucial to measure your rope. This tool ensures accuracy while allowing you to plan the design of your lamp precisely.
- Protective Gear: Safety first! Wear safety goggles and gloves to protect yourself from hot glue and sharp tools as you work on your lamp.
Each of these materials plays an integral role in the lamp-making process, so be sure to gather them all before you start. As you collect your supplies, consider how you want your lamp to look. This is where your creativity can shine! Whether you want a modern twist or a more traditional rustic vibe, the choices you make at this stage will set the foundation for your lamp’s design.
Designing Your Lamp
Once you have all your materials ready, it’s time to unleash your creativity. Think about shapes and patterns you want to explore. Do you envision a simple, wrapped cylinder of rope, or perhaps a more elaborate twisted design? You can even integrate different materials, such as glass or metal accents, for a more sophisticated look. Here are a few design ideas to inspire you:
- Cylindrical Lamp: A classic choice, this design is perfect for showcasing the texture of your rope. Wrap the rope tightly around the base in rows, securing it with hot glue as you go.
- Twisted or Braided Lamp: For an eye-catching look, consider twisting or braiding strands of rope together. This design adds depth and character, perfect for making a statement in any room.
- Layered Lamp: Create visual interest by layering different colors or textures of rope. Combining light and dark hues can add a beautiful contrast to your lamp, making it pop.
Remember, the possibilities are endless! Your handmade rope and glue lamp will reflect your unique style, transforming any space into a personalized sanctuary. So, get imaginative and start sketching out your ideas; it’s time to bring your vision to life!
Exploring the Advantages of DIY Rustic Lighting
In the world of interior design, creating a unique and personalized atmosphere is essential. One innovative way to achieve this is through the art of making your own lamps. Below, we delve into the benefits of using **Create Handmade Rope and Glue Lamps DIY Rustic Lighting Guide**. This crafty approach not only adds character to your space but also allows for customization that aligns perfectly with your style.
| Category | Description |
|---|---|
| Customization Options | With this guide, you can choose colors, patterns, and designs that complement your home decor. |
| Cost-Effectiveness | Creating your lamps is often much cheaper than buying mass-produced alternatives without sacrificing quality. |
| Sustainable Materials | Using natural materials like rope promotes sustainability and environmental-conscious living. |
| Creative Expression | This project is a perfect outlet for your artistic abilities, allowing you to craft something truly one-of-a-kind. |
Harnessing your creativity through lamp-making can significantly enhance your living space and serve as a discussion starter with guests. Embrace the charm of rustic DIY projects, and watch as they transform your home into a cozy haven.
CHECK OUT: Click here to explore more
Step-by-Step Guide to Crafting Your Rope and Glue Lamp
Now that you have gathered all your materials and conceptualized your design, it’s time to get down to the business of creating your very own handmade rope and glue lamp. This step-by-step guide will ensure that your crafting process runs smoothly and your lamp turns out just as you envisioned.
Step 1: Preparing the Lamp Base
Start by cleaning your lamp base thoroughly. If you are using an old lamp, make sure to remove any existing coverings or elements that may hinder the application of rope. If you’re using wood or metal, sanding the surface lightly can help the glue bond better. Additionally, measure the height and circumference of your base, as this will be important when cutting your rope. This foundational step provides a secure foundation for your lamp project.
Step 2: Cutting the Rope to Size
Using your measuring tape, cut the rope into lengths that will wrap snugly around your lamp base. Depending on your design, you may need shorter pieces for intricate patterns or longer lengths for a more streamlined look. A good rule of thumb is to cut several pieces around 1 to 2 feet long to start—this way, you can adjust as you create without overwhelming yourself.
Step 3: Gluing the Rope to the Base
With your hot glue gun ready, begin attaching the first rope piece to the base. Start at the bottom of the lamp, applying a bead of hot glue and immediately pressing the rope onto it. Be careful to keep the rope taut but not stretched, as this will maintain the structure without distorting the design. Continue gluing row by row, ensuring that each new layer slightly overlaps the previous one, creating that classic rustic appearance.
Step 4: Experimenting with Design Patterns
As you work your way up, feel free to experiment with different techniques. This could mean adjusting the tension of the rope, changing directions, or incorporating additional colors or textures of rope. The idea is to personalize your lamp; for example, adding a braided design partway up can introduce an appealing contrast. Always remember to secure the ends of your rope strands with glue to prevent unraveling.
Step 5: Mounting the Light Fixture
After you’ve achieved your desired design with the rope, it’s time to attach the light fixture. If you’re repurposing an old lamp, ensure that the socket is in good working condition. For new fixtures, follow the manufacturer’s instructions and secure the socket to the top of the base. Ensure that the wiring is properly connected and that it adheres to electrical safety standards before proceeding.
Step 6: Adding the Finishing Touches
With your lamp now fully assembled, stand back and admire your work! Make any final adjustments that might be needed, and give your lamp a thorough inspection to ensure everything is secure. You can even add embellishments like colored beads or small metal accents for a unique flair. Finally, screw in your chosen bulb, plug in the lamp, and flip the switch to see your creation come to life!
Inspiration for Customization
Your handmade rope and glue lamp is not just a lighting solution; it’s an opportunity for self-expression. Consider incorporating elements such as painted finishes, patterned fabrics as lamp shades, or even incorporating greenery for a truly bespoke appearance. The beauty of DIY is that you can truly make it your own!
As you embark on this crafting journey, remember that each imperfection adds character to your creation. Embrace the process and enjoy the warm ambience your new lamp will bring to your home!
SEE ALSO: Click here to read another article
Conclusion
Creating your own handmade rope and glue lamp is more than just a DIY project; it’s an inviting journey into the world of personalized home decor. Not only does this rustic lighting solution illuminate your space, but it also reflects your unique style and creativity. The steps outlined in this guide—from preparing the base to securing the light fixture—offer a clear and enjoyable pathway for anyone, whether you’re a seasoned crafter or a novice.
As you bring your lamp to life, remember that every twist of rope adds charm and character. The opportunity for customization is vast; explore varied designs, textures, and embellishments that resonate with your aesthetic. Consider experimenting with lightbulb styles to enhance the ambiance, as the right bulb can dramatically transform the look and feel of your lamp. Additionally, don’t hesitate to seek *inspiration* from online platforms focused on home decor and craft projects, as these can often provide fresh ideas and innovative approaches.
Finally, as you bask in the warm glow of your finished piece, take a moment to appreciate not only your craftsmanship but also the memories created during this process. Your handmade lamp serves as a testament to your creativity, patience, and dedication—qualities that will undoubtedly shine through in your home. So, gather your materials, unleash your creativity, and dive into the transformative experience of crafting a rustic lighting masterpiece that truly belongs to you!